
In my previous post I introduced the problem of wireless servo control using a pair of BeagleBone Blacks (BBBs) and RFM22B transceivers. In this post I'll talk about getting the RFM22B working with the BBB and how to set up a simple link between two of them. I am using a pair of 868MHz modules in the DIP package, available here. My BBBs are running the latest Ubuntu image (2013-07-22) with the patched device tree compiler, but this should all work equally well under Angstrom.
Hardware
You shouldn't power on these modules without an antenna attached (particular at higher power settings), so first order of business is to create a pair of antennae. To get things up and running a simple quarter wave wire antenna will do. I plan on using a centre frequency of around 869.5MHz, so the length of wire needed is
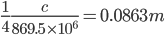
where  is the speed of light in
  . After soldering on the wires, I put them in a little plastic tube to protect them and keep them straight.
 Attaching antennae Attaching antennae |
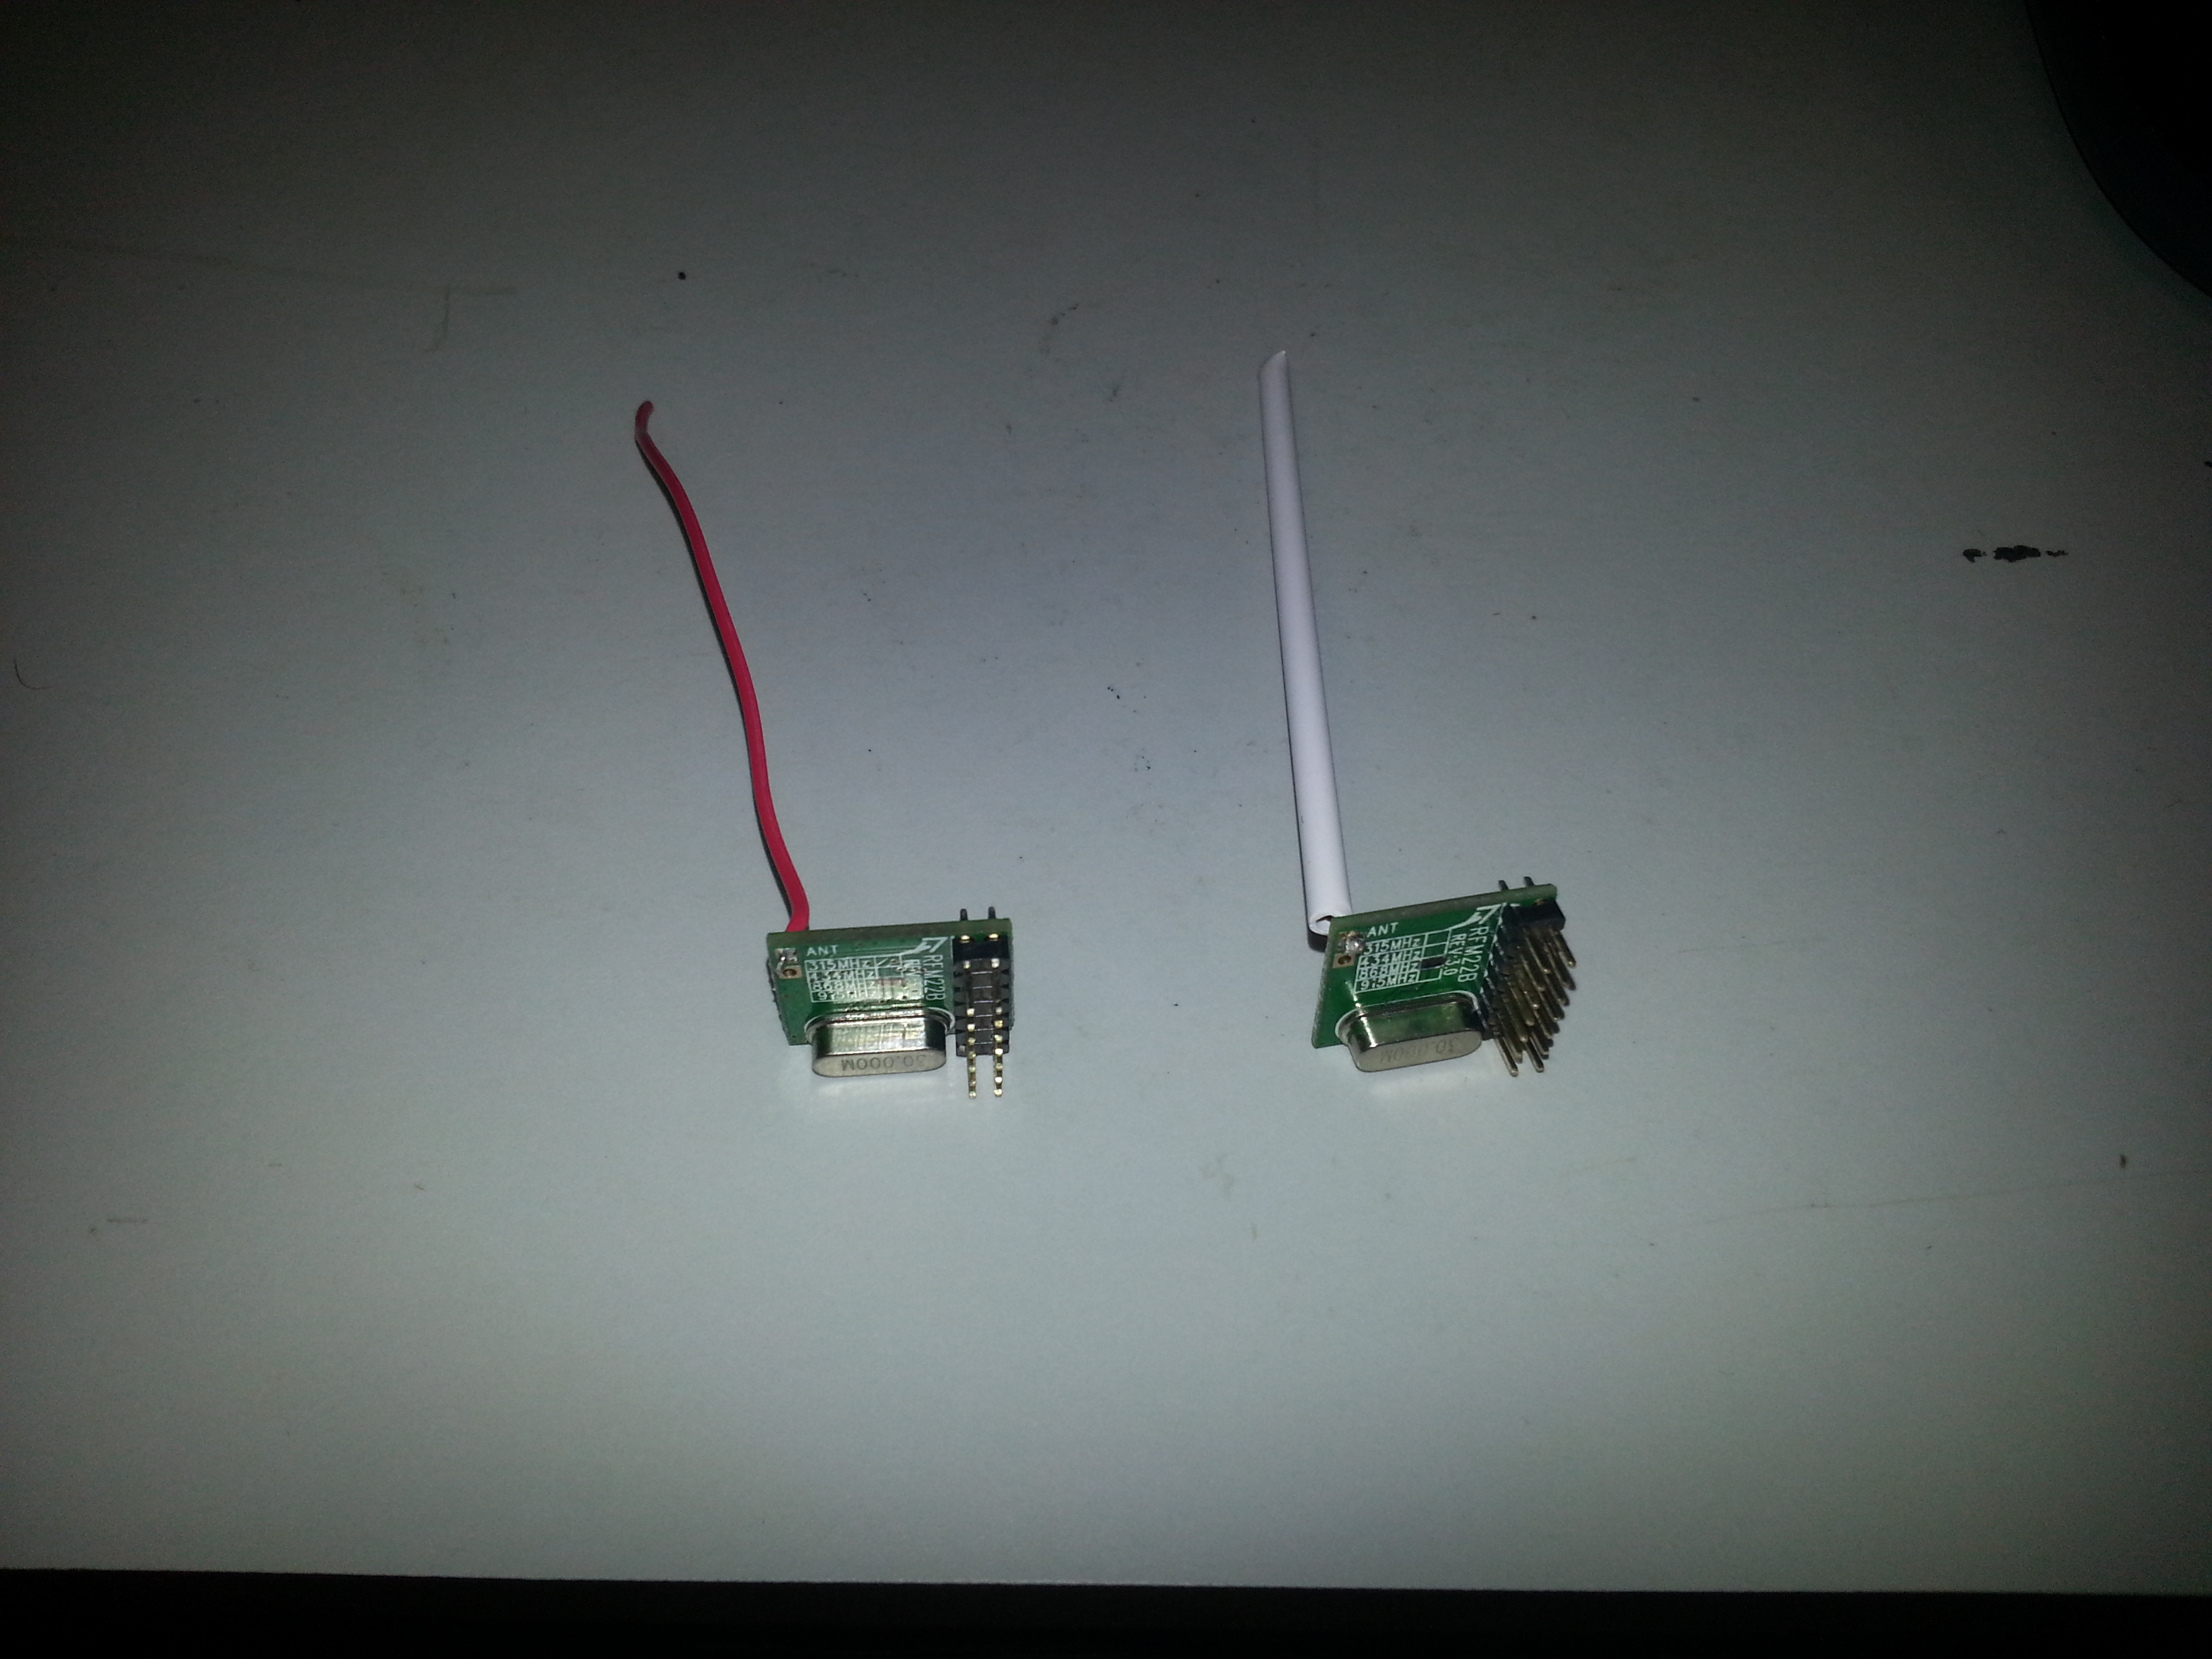
 Hooking up to BBB Hooking up to BBB |
|---|
With antennae attached we can go ahead and hook the RFM22Bs up to the BBBs. The pin spacing on the RFM22Bs is 2mm rather than the standard 2.54mm (0.1") so I bought some 7x2 2mm spaced crimp connectors to hook them up.
Here is the wiring detail (to SPI0 on the BBB), the RFM22B doesn't have clearly defined pin numbers so I'll use the names given in the datasheet.
| RFM22B pin | BBB pin |
|---|---|
| GND | P9_1 |
| VCC | P9_3 |
| SDO | P9_21 |
| SDI | P9_18 |
| SCK | P9_22 |
| NSEL | P9_17 |
A few pins on the RFM22B need to be hooked up to each other as well.
| RFM22B pin | RFM22B pin |
|---|---|
| TX_ANT | GPIO_0 |
| RX_ANT | GPIO_1 |
| SDN | GND |
This ties the shutdown pin (SDN) to ground, ensuring the device remains on. If this is left floating the device randomly resets during use which causes all manner of strange behavior! The antenna selection pins (TX_ANT and RX_ANT) will be discussed in more detail later, for now just hook them up as above. That's it for the hardware set up, now to look at the software.
Software
Enable SPI with the device tree
As with all things BBB, the first issue to overcome is the dreaded device tree overlay. Looking in to /lib/firmware gives you some initial false hope
ls /lib/firmware | grep SPI0
BB-SPI0-00A0.dtbo
Loading this overlay didn't have any effect for me. The desired effect being the appearance of a /dev/spidev* node. After some googling, I came across the elinux.org wiki page which gives a working SPI0 overlay.
/dts-v1/;
/plugin/;

/ {
    compatible = "ti,beaglebone", "ti,beaglebone-black";

    /* identification */
    part-number = "spi0pinmux";

    fragment@0 {
        target = <&am33xx_pinmux>;
        __overlay__ {
            spi0_pins_s0: spi0_pins_s0 {
                pinctrl-single,pins = <
                    0x150 0x30  /* spi0_sclk, INPUT_PULLUP | MODE0 */
                    0x154 0x30  /* spi0_d0, INPUT_PULLUP | MODE0 */
                    0x158 0x10  /* spi0_d1, OUTPUT_PULLUP | MODE0 */
                    0x15c 0x10  /* spi0_cs0, OUTPUT_PULLUP | MODE0 */
                >;
            };
        };
    };

    fragment@1 {
        target = <&spi0>;
        __overlay__ {
             #address-cells = ;
             #size-cells = ;

             status = "okay";
             pinctrl-names = "default";
             pinctrl-0 = <&spi0_pins_s0>;

             spidev@0 {
                 spi-max-frequency = ;
                 reg = ;
                 compatible = "linux,spidev";
            };
        };
    };
};
Save this as BB-SPI0-01-00A0.dts, then compile and install with
dtc -O dtb -o BB-SPI0-01-00A0.dtbo -b 0 -@ BB-SPI0-01-00A0.dts
sudo cp BB-SPI0-01-00A0.dtbo /lib/firmware/
Load the overlay with (must be run as root, sudo does not work!)
echo BB-SPI0-01 > /sys/devices/bone_capemgr.*/slots
And the /dev/spidev1:0 node appears!
C++ Example
I was initially planning to prototype everything in Node.JS, but since I couldn't get the SPI plugin to actually do anything I just went straight to C++. All the code is available on GitHub.
I wrote a basic SPI class (see include/spi.h and src/spi.cpp) which lets you control the speed of the bus and transfer data. For those not familiar with SPI (which I wasn't when I started this), the transfer process is a little strange. Sending data requires you to specify both a transmit and receive buffer of equal lengths. The transmit buffer gets sent and the receive buffer goes unused. Receiving data also requires transmit and receive buffers of equal length. The first part of the transmit buffer contains the register you want to read (similar to I2C devices), but the rest of the buffer must be zero filled. The receive buffer gets populated during the transfer, starting at the byte immediately preceding the last non zero byte in the transmit buffer.
For example, to receive 8 bytes (1,2,3,4,5,6,7,8) from register 0x30 you would have a transmit buffer equal to
0x30 0x00 0x00 0x00 0x00 0x00 0x00 0x00 0x00
After the transfer, the receive buffer would be
0x00 0x01 0x02 0x03 0x04 0x05 0x06 0x07 0x08
Notice that both buffers are 9 bytes long, one for the register and eight for the data.
Thinking about this now (the joy of hindsight), you can probably use the same buffer for sending and receiving since there is no overlap. Note to self, try this out!
The RFM22B (and probably other SPI devices), uses 7 bit registers with the 8th bit used to identify a read or write operation (0 - read, 1 - write).
The RFM22B class (include/rfm22b.h, include/rfm22b_enums.h and src/rfm22b.cpp) contains functions for getting and setting the majority of parameters explained in the datasheet. These include:
- setCarrierFrequency - sets the carrier frequency in Hertz
- setDataRate - sets the data rate in bps
- setTransmissionPower - you get the idea...
Functions which handle sending and receiving of data packets are also included.
There is a simple send/receive example (rfm22b_send_test.cpp and rfm22b_receive_test.cpp) which I'll go through here in detail.
#include "rfm22b.h"

int main() {
	// Initialise the radio
	RFM22B *myRadio = new RFM22B("/dev/spidev1.0");

	// Set the bus speed
	myRadio->setMaxSpeedHz(200000);

	// Radio configuration
	myRadio->reset();
	myRadio->setCarrierFrequency(869.5E6);
	myRadio->setModulationType(RFM22B::GFSK);
	myRadio->setModulationDataSource(RFM22B::FIFO);
	myRadio->setDataClockConfiguration(RFM22B::NONE);
	myRadio->setTransmissionPower(5);
	myRadio->setGPIOFunction(RFM22B::GPIO0, RFM22B::TX_STATE);
	myRadio->setGPIOFunction(RFM22B::GPIO1, RFM22B::RX_STATE);

	// What header are we broadcasting
	myRadio->setTransmitHeader(123456789);

	char output[RFM22B::MAX_PACKET_LENGTH] = "Hello World!";
	printf("Sending '%s'\n", output);
	myRadio->send((uint8_t*)output, RFM22B::MAX_PACKET_LENGTH);
	myRadio->close();
}
- Line 5 - Creates a new instance of the class, telling it which SPI port to look at
- Line 8 - Sets the speed of the SPI bus to 200kHz (RFM22B works up to 10MHz, 200kHz was just an arbitrary value)
- Line 11 - Resets all the registers of the RFM22B to their default states
- Line 12 - Sets the carrier frequency to 869.5MHz
- Line 13 - Sets the FM modulation type to GFSK
- Line 14 - Sets the data source to the RFM22B's internal FIFO (see below)
- Line 15 - Sets the data clock configuration to nothing (not needed for FIFO)
- Line 16 - Sets the transmission power to 5dBm
- Lines 17-18 - Sets the GPIO functions (see below)
- Line 21 - Sets the header we are broadcasting (see below)
- Lines 23-25 - Send "Hello World"
- Line 26 - Closes the device
The RFM22B has a 64 byte FIFO which is the easiest way of using the device. For sending, a buffer is written in to the FIFO register then the device is set to transmit mode. The device then transmits the data and clears the FIFO. For receiving, you place the device in to receive mode and it fills the buffer when a packet is received.
The GPIOs on the RFM22B can be configured in a number of ways. To simplify the connection to the BBB, you should use the GPIOs to switch antenna in to transmit or receive mode as required, these were connected earlier on. If you choose not to do this, you need to hook the TX_ANT and RX_ANT pins up to GPIOs on the BBB and toggle them appropriately from your code.
The RFM22B has a packet handler which is enabled by default and enables you to perform basic authentication of incoming data. To make use of this you should set the transmit header to something unique before sending any data, and set the corresponding check header on the receiver.
The receive code is largely identical, until the last few lines.
#include "rfm22b.h"

int main() {
	// Initialise the radio
	RFM22B *myRadio = new RFM22B("/dev/spidev1.0");

	// Set the bus speed
	myRadio->setMaxSpeedHz(200000);

	// Radio configuration
	myRadio->reset();
	myRadio->setCarrierFrequency(869.5E6);
	myRadio->setModulationType(RFM22B::GFSK);
	myRadio->setModulationDataSource(RFM22B::FIFO);
	myRadio->setDataClockConfiguration(RFM22B::NONE);
	myRadio->setTransmissionPower(5);
	myRadio->setGPIOFunction(RFM22B::GPIO0, RFM22B::TX_STATE);
	myRadio->setGPIOFunction(RFM22B::GPIO1, RFM22B::RX_STATE);

	// What header do we want?
	myRadio->setCheckHeader(123456789);

	// Listen for a packet
	printf("Listening to a message...\n");

	char input[RFM22B::MAX_PACKET_LENGTH];
	myRadio->receive((uint8_t*)input,RFM22B::MAX_PACKET_LENGTH);
	printf("%s\n", input);

	myRadio->close();
}
You can get hold of, and build the examples with
git clone https://github.com/omcaree/rfm22b
cd rfm22b
make
Run the receive code first as this will block until something is received. Then (on another BBB, obviously), run the sending code, you should see this
./rfm22b_receive_test
Listening to a message...
./rfm22b_send_test
Sending 'Hello World!'
Hello World!
A note on Automatic Frequency Control (AFC)
I said above that the RFM22B class has setters for the majority of parameters. It does not, however, (yet) have setters for AFC. AFC is used when receiving to cater for differences in the source clocks of the transmitter and receiver and its parameters must be updated whenever the modulation type, frequency deviation or data rate are changed.
In the examples above, I didn't change the data rate, deviation or modulation type (strictly speaking I did, as the default modulation is unmodulated, but the default AFC values are for GFSK), so I didn't have to worry about AFC. If you wish to modify these then you'll need to get hold of the RFM22B Register Settings Spreadsheet and set the registers manually. Here is an example of some AFC settings for a 57.6kbps data rate with 30kHz deviation.
        // Set deviation
        myRadio->setFrequencyDeviation(30000);

        // Set data rate
        myRadio->setDataRate(57600);

        // Receiver AFC settings determined from RFM22B Spreadsheet
        myRadio->setRegister(0x1C, 0x06);
        myRadio->setRegister(0x20, 0x45);
        myRadio->setRegister(0x21, 0x01);
        myRadio->setRegister(0x22, 0xD7);
        myRadio->setRegister(0x23, 0xDC);
        myRadio->setRegister(0x24, 0x07);
        myRadio->setRegister(0x25, 0x22);
        myRadio->setRegister(0x1D, 0x40);
        myRadio->setRegister(0x1E, 0x0A);
        myRadio->setRegister(0x2A, 0x2D);
        myRadio->setRegister(0x1F, 0x03);
        myRadio->setRegister(0x69, 0x60);
Once I've had time to reverse engineer the spreadsheet, I will modify the RFM22B class to automatically set the AFC registers whenever data rate, deviation or modulation are modified.
This post has covered the basics of interfacing an RFM22B transceiver with a BBB. In my next post I discuss the use of the Programmable Realtime Unit (PRU) on the BBB to generate high resolution PWM servo control signals.
Hey Omar, nice work! I'm using the rfm22b modules and the beaglebone black for a school project. When I try to run the setup test on the bbb the code seems to pause after printing "Initial Settings..." and seems to be stuck. Strange enough, if I close spidev1.0 the code runs (albeit unable to get an SPI device). So I am unsure as to why the code just stops there.